
Detailed guide for guests
The following guide will hopefully give you the information you require to make your stay as enjoyable as possible!
Please use the menu above to find out other information about the area and house.
Should you want any more information, please drop us an email to info@oldvicaragevowchurch.co.uk
For more urgent inquiries, please contact Elwyn Powell on 0771 3063413 or Gavin Powell on 07957 762298
This page contains information on the following:
General Heating & Hot Water - Summary
Heating & Hot Water - Detailed
Checking in and out
Telephone and broadband (WiFi Code)
Hot Tub & Sauna
Facilities for young children
Kitchen & Utility room White goods, coffee, what goes where
Recycling
Speakers
Herb garden
Dining room & lounge Using the Open fire
Wood burner - the basics
Wood burner - detailed
Upstairs
Health & Safety, emergency contacts
General
Information about about things to do in the area are included separately on the Area page on our website
TOURISM HIGHLIGHTS
FOOD & DRINK - places to eat but also much more
LOCAL AMENITIES - nearest shops for supplies
WALKS - a selection of places to get out and about
Heating & Hot Water - Summary (simple version is hopefully all you need)

Central Heating:
The central heating by default should be set to "Auto". This will follow a set range of temperatures (warmer in the morning and evening).
The present temperature in the house is shown in the centre of the screen.
If the house is too cold:
The boiler could already be trying to reach the correct temperature (if there is a flame logo showing). If not, you can increase the target temperature by pressing the up button. The boiler will then temporarily work to heat the house to that temperature
If the house is too hot:
If the heating is making the house too warm, you can change the target temperature using the down button. This will temporarily reduce the target temperature.
Alternatively, you can change the heating (CH) to "Off" with the “Current Function (CH)” button. This means that the central heating will not come on until the mode is changed back to "Auto"
Hot Water:
The Hot Water by default should be set to "Auto". This should ensure that there is always enough hot water. If you happen to have a lot of baths in the day time (or something similar) and you run out of hot water, you should press "Advance". NB The two showers in the ensuite rooms heat their own water so they will never run out of hot water (as long as they are turned on!)
Heating & Hot Water - Detailed explanation (hopefully this detail is not required)
The heating has various segments through the day, each with a target temperature. This means the house is warmest in the morning and evening when it is most needed with a lower temperature at other times.
The following are the specific temperature segments:
04.00 - 06.00 - 21 C
06.00 - 12.00 - 22 C
12.00 - 16.00 - 20.5 C
16.00 - 00.00 - 22 C
00.00 - 02.00 - 21 C
02.00 - 04.00 - 20 C
Should you want to change the temperature in a certain segment, this can be done using the thermostat on the landing.
The new temperature will remain in place until the next segment starts when it will revert to the schedule.
For example, if you were staying in the house over the afternoon and at 13.00, you felt that 18C was too cold and wanted to change the setting to 21C, this would remain the target temperature until the next segment started at 18.00 when the target would revert to the scheduled temperature of 22C
Hot water comes on between 6.00 and 12.00 and 16.30 and 21.30 which should hopefully mean you never run out of hot water. We do have a very large hot water tank (the largest we could fit in!) but if through a multitude of baths this is exhausted, it usually takes about 45 minutes to reheat. The showers in the 2 en suite bathrooms are electric and do not run off the same hot water system so they should always have hot water.
Checking in / out
Arrival time is 3pm and the house needs to be vacated by 10am on the day of departure. This is to allow the cleaners to prepare the house ready for the next guests.
Locking up
The large "Front" door (facing the car park) cannot be opened from the outside. To open from the inside, slide the knob to the left and pull. Pulling the door closed is sufficient to "lock" it.
The "Side" door (facing the hot-tub) is the main door to use and is the one that your yale key accesses. Please do not flick the switch on the yale lock when the door is locked as this runs the risk of you getting locked out.
The "Back" door (leading to the patio) should be locked via the bolt whenever you go out.
Both patio doors should also be kept locked whenever you are out (note that they have separate locks with separate keys)
At the end of your stay, to ensure the house is ready for the next guests, please can you make sure the following are completed:
Rubbish / Recycling is placed in the bins by the roadside
All washing up is done and crockery etc put away
Barbecue is fully cleaned (if used)
All windows are closed, doors locked and the yale keys returned to the key-safe (Patio door keys remain in the door).
Telephone and Broadband
Given the limited mobile phone signal, please feel free to use the house phone if necessary.
The number is 01981 551 283 should you want to share that as an emergency contact number
Broadband is good enough for Skype/Facetime/WhatsApp - Wifi code is 20172017
Hot Tub & Sauna


Facilities for young children
The house has the following items included should they be required:
2 x High chairs
2 x Travel cots (bedding not included)
Security gate for bottom of stairs (NB. No gate provided for the top of the stairs)
Should you use any of these, please can you ensure they are fully cleaned at the end of your stay. Details are shown below for where these are stored.
If you would like them to be brought out prior to your arrival, please can you give us suitable notice in advance
The High chairs and stair gate are kept in the wardrobe in the Ronnie Room & the cupboard in the Rare Breed Room (please take care if reaching up to the cupboard):


Kitchen & Utility Room
General white goods, coffee maker, what goes where etc
The Kitchen hopefully has everything that you require. Should there be something extra that you think would be helpful to be included, please do let us know.
Most things are pretty self-explanatory but if for example you should want to check what the best setting is for the washing machine, we have included the manuals below.
The most important guide is probably how to use the coffee machine and milk frother! (if you require capsules, Tesco sell a variety of Nespresso compatible options. Alternatively, the cafetiere is a more than capable option)
The kitchen contains
Dishwasher Basic Guide:
Keep the appliance door ajar.
Press the on/off button to activate the appliance. Make sure that the appliance is in programme selection mode.
Press the programme button until the indicator of the programme you want to set comes on.
Close the appliance door to start the programme.
We feel that we have a fully stocked kitchen but are aware that it is not always easy to find certain things in a new kitchen so please see the picture below which shows where various thinmgs are stored. Please try to return items to the correct place so that the next guests are also able to find them!

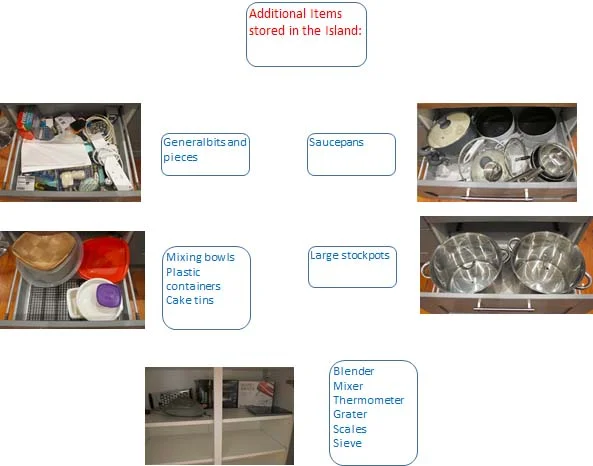
Items of interest in the utility room are a full sized table football table and a barbecue. I don't think the table football needs any explanation but the barbecue is a top of the range charcoal grill. Should you want to use it, please can you make sure that it is fully cleaned at the end of your stay.
Utility room contains
Recycling:
Please try and recycle as much as possible. The following items show what is currently able to be recycled in Herefordshire. The bins (both recycling and general rubbish) are down by the roadside. These are emptied on a Tuesday
Food tins and drink cans
Food tins
Drink cans
Aerosol cans
Sweet and biscuit tins
Metal jar lids
Plastic bottles and containers
Drinks bottles
Milk and juice bottles
Detergent and fabric conditioner bottles
Cleaning and bleach bottles
Toiletry bottles
Yoghurt pots
Margarine and ice cream tubs
Fruit and vegetable punnets
Plastic meat and fish trays
Cream and custard pots
Cake and pastry trays
Soup and sauce pots
Hard plastic caps and lids
Paper
Newspapers and magazines
Phone directories
Catalogues and brochures
Junk mail and leaflets
Letters
Greetings cards
Paperback books
Envelopes
Cartons
Milk, juice and smoothie cartons
Fabric conditioner cartons
Soup and chopped tomatoes cartons
Custard cartons
Cardboard
Cardboard boxes, for example cereal boxes, ready meal boxes
Corrugated and thick cardboard boxes
Egg boxes
Kitchen and toilet roll tube
Mixed glass bottles and jars (for recycling bins only)
Please do not place glass bottles and jars in recycling sacks for your own safety.
Glass bottles
Glass jars
Metal caps and lids
Please remember:
Rinse out all food and drink containers
Only clean and dry recyclable items
Place items loose into the bin - no bags or carriers
Labels can be left on
No need to squash cans, bottles, plastics or cartons
For further information on what you can recycle you can download the guide and put on your fridge as a reminder.
Please do NOT put the following items in your recycling bins or sacks, they are not currently recyclable
Carrier bags
Cling film
Brown and black plastic
Plant pots or tubs
Corks
Sharps (for example, needles)
Aluminium foil
Shiny wrapping paper
Pet food pouches
Crisp packets
Tissue, toilet roll or kitchen towels
Wet or dirty items
Pyrex glass
Flat glass
Light bulbs
Electrical items
Batteries
Garden waste
Clothes and textiles
Polystyrene
CD and DVDs and their cases
Paint containers
Pottery and crockery
Wood
Furniture
Other general rubbish
Speakers
We have two speakers that we sometimes use, the first is a Sonos speaker and the second is an Intempo bluetooth speaker.
Depending on which one is available, please see instructions below.
Intempo Bluetooth speaker
Connecting to your laptop / mobile phone:
Turn on the speaker with the small switch at the back.
Turn on bluetooth on your device. It should soon connect to the speaker.
Audio should then be output through the speaker.
When you have stopped using it, please turn it off at the back again.
Should there be any issues, there is a small lead at the back of the speaker that allows direct connection (as long as the cable has not been lost!)
Sonos speaker
Connecting to your laptop / mobile phone:
Connection can be via physical cable but the simplest way is to download a app. This is actually a very simple exercise taking a couple of minutes and the app can be removed later should you want the space back. The official instructions are shown below:
How to Set Up Sonos: Standard Setup
In a Standard Setup, your Sonos products will connect directly to your home’s WiFi network. You can place your Sonos product in any room that has a good connection to your home’s WiFi signal.
Steps to set up Sonos on your home WiFi:
Plug in your Sonos product to power.
Download the Sonos app to your phone, tablet, or computer that is connected to your home WiFi network.
Open the Sonos app and select "Setup New System".
When you're presented with a choice between STANDARD and BOOST setup, select STANDARD and follow the on-screen prompts.
Watch a video of how to connect.
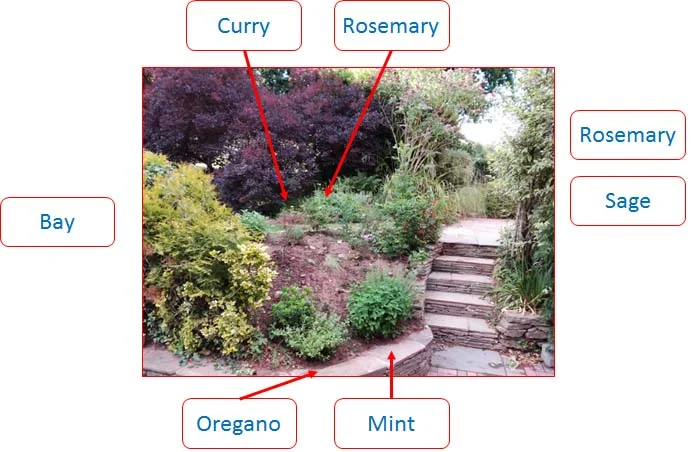
The Herb Garden
For those of you who enjoy cooking, we have a selection of herbs available for you just outside the back door. Depending on the weather, they may not all be available but this is the present list of options available!
Dining Room & Lounge
The Dining Room has a DVD player and a WII attached to the TV.
In addition, the lounge has an LG smart TV. Feel free to use it to access your Netflix or NOW TV accounts.
Detailed instructions shown in the manual.
Using the Open Fire
If you are lighting the open fire, please ensure all safety precautions are taken.
It should never be left unattended without the guard fully in place.
As with the wood burner, additional seasoned wood can be obtained from Locks garage
Wood BurneR
The Basics:
There are 2 controls.
The upper one controls air entering to the bottom of the stove. This should be turned anti clockwise to start the fire. Once the fire is going properly, this can be closed. By leaving this open, heat is wasted by going up the chimney.
The lower gauge controls air entering the centre of the stove. This should be used to manage the fire. Initially it should be to the far right (allowing air to enter the chamber). Once the fire is going well, should you want to reduce the rate of burning then this can be moved to the left. If it is moved fully to the left, the fire will probably go out. The further to the right, the quicker the fire will burn meaning more heat but more wood being burnt!
Ashes do not need to be cleared out if burning wood. The logs actually like to sit on a bed of ashes.
Should you need more wood, please ensure you only buy seasoned wood. The best place to get this from is Locks Garage where a net of wood costs less than £5.
Please ensure you use the glove to open the door. The Stove gets very hot
It takes the while for the burner to warm up the room so suggest that f you think you will be using it, get it started nice and early. You can't beat watching the flames as you eat dinner!
More detailed Instructions:
Prepare your wood burning stove

Open the Airwash and Primary Air Controls fully to ensure the fire gets the air supply it needs to establish properly. There is an indicator at the top of many appliances to show which direction to move the control from closed to open. You will find that many appliances also have a secondary air control to provide a cleaner burn and give greater thermal efficiency and most have this control factory set.
Open the door of your wood burning stove and create a firebed.
Place firelighters, or paper, and dry kindling wood on the grate (multi-fuel version) or firebed (wood burning version) – kindling wood is very dry, small pieces of wood and twigs that will catch alight easily. A successful fire initially requires plenty of kindling to establish a hot firebox and warm the chimney to aid flue performance.
Light the paper or firelighters.

Wait for the kindling to catch alight and start burning vigorously. Note the position of the log guard and the air inlet holes at the back of the stove as they are important features of the appliance. The log guard holds all the burning fuel inside the firebox and keeps it away from the glass. To create a cleaner and more efficient heat output, the air inlet holes circulate heated secondary air back into the burn chamber to reignite unburnt combustible gases.
Leave the door slightly open.

By doing this, you will increase the flue pull to assist in lighting the fire and avoid condensation building up on the inside of the glass.
Add larger pieces of wood.

Once the kindling is burning well; add larger pieces of split wood to create a stable firebed. Do not use full sized logs at this stage, build up gradually in size. Too many logs may smother the fire. For safety and efficiency reasons do not load fuel above the log guard and the secondary combustion air inlets at the back of the firebox.
You may now shut the door.

Add larger pieces of wood when necessary.
Upstairs
Hopefully most things should be self-explanatory. We have 2 king size rooms, 1 double, 1 single and 1 family with a twin room downstairs.
As mentioned earlier, the two ensuite showers are electric with everything else being run from the hot water boiler. A bath towel and a hand towel are provided for each guest and will be found in each room.
Should you have forgotten your toothpaste or something similar, please check in the drawers on the landing and feel free to help yourself.
If you want to use the free standing bath in the main bathroom, please press the "collar" around the plunger a little push to ensure that the water does not leak.
Health & Safety, Emergency contacts etc
Fire Safety
The house is equipped with 3 fire extinguishers and 1 fire blanket.
If a fire is identified, first priority should be people's safety rather than putting the fire out.
Please note the following locations:
Ground floor Hallway and First Floor Landing - Foam Extinguishers - Suitable for solids such as paper, wood, plastic etc. Not suitable for electric fires.
Kitchen - Powder extinguisher - Suitable for all round use.
Fire Blanket - suitable for pan fires in the kitchen
General Fire Extinguisher usage:
Pull the pin.
Aim the nozzle at the base of the fire. Hitting the tops of the flame with the extinguisher won't be effective. ...
Squeeze the trigger. In a controlled manner, squeeze the trigger to release the agent.
Sweep from side to side. Sweep the nozzle from side to side until the fire is put out.
General Fire Blanket Usage:
Turn off the source of heat if it is safe to do so, if not do this as soon as possible after the flames have been extinguished.
Pull the fire blanket out of its container and stretch it out fully, making sure that it covers the size of the fire.
Keep the blanket at arm’s length and approach the fire – looking over the top of the blanket, so you have a clear view of what you are doing.
Cover the burning pan, completely smothering the flames.
Leave the blanket in place for at least 30 minutes to an hour before removing to avoid re-ignition.
After putting the blanket on the flames – leave the room, shutting the door behind you and call the fire brigade. They will need to make sure everything is safe before you can re-enter the building, so this is important even if the fire has been put out.
Emergency Lighting:
There is an emergency torch plugged in on the landing. This will glow in the night time and should the power go off, it will come on full power. As such, this socket should be kept switched on.
If the torch is removed from its charging bay, it will also come on (and hence can be used as a torch!)
If this is used, please ensure it is returned afterwards.
In case of fire:
Please exit the building as quickly as possible. It is recommended to use the "side" door to exit (the one next to the downstairs toilet). This avoids possible confusion around unlocking the bolt on the "back" door or the unusual mechanism on the "front" door.

Please congregate in the carpark area.
Additional General Information
Stop cock - The stop cock is in the downstairs toilet below the sink
Fusebox - The main fusebox is in the kitchen in the box to the right of the patio doors
Light bulbs etc - Spare lightbulbs are kept in the top drawer in the kitchen island but please do not take any risks if a bulb needs replacing
Emergency Contact Numbers
Emergency number for Fire/Ambulance/Police - 999
Non-urgent number - 101
Nearest hospital is in Hereford: Hospital directions are available online
The County Hospital, Stonebow Road, Hereford, HR1 2BN
The local GPs practice has two surgeries with Peterchurch being the closest
Peterchurch Surgery
Tel: 01981 550322
Peterchurch Surgery, Closure Place, Peterchurch, Hereford, HR2 0RS
Also:
Ewyas Harold
Tel: 01981 240320